TransitionsScreen Flow
Screen View
The Screen Flow setting screen is divided into four large sections. Link scenes on the flow chart and perform detailed set up for each link.
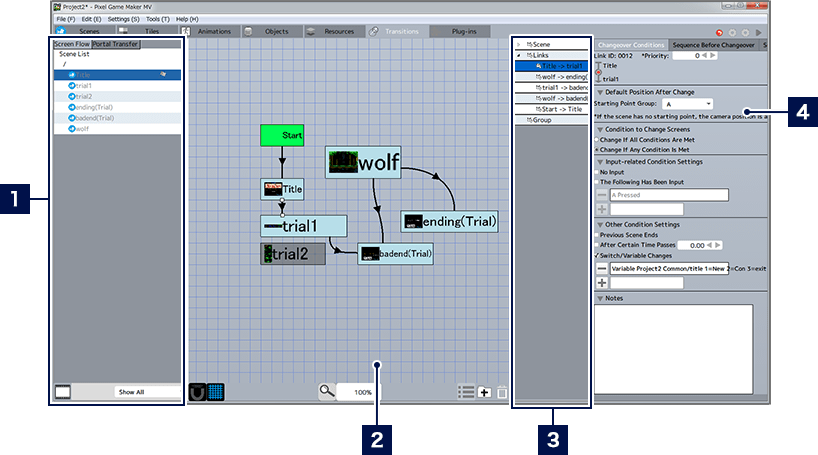
- 1Scene List
- The list of scenes created with the "Scenes" tool are displayed (the scene and folder order is the same as in "Scenes"). The scenes already placed on the flow chart have a fainter text color. You can change the display format, and narrow down the items displayed by clicking the menu button at the bottom or using the pull down menu.
- * The special scene "menu scene" is not displayed on the list.
- 2Flow Chart Area
- In the flow chart area, you can check the relationships of each scene. You can scroll up and down using the mouse wheel, or hold down the mouse wheel and drag to scroll in all four directions.
- 3Flow Element List
- A list of scenes, links, and groups placed in the flow chart. Click to select the corresponding item on the flow chart.
- 4Detailed Settings for Selected Link
- Displayed when a link is selected. You can configure the scene switch conditions, sequence to be shown on transition, and more.
Flow Chart Creation
Scenes not yet placed in the flow chart can be placed by dragging them from the scene list onto the flow chart. Select and right click a placed scene and select "Add Link" from the context menu and you can create a link using an arrow between scenes.
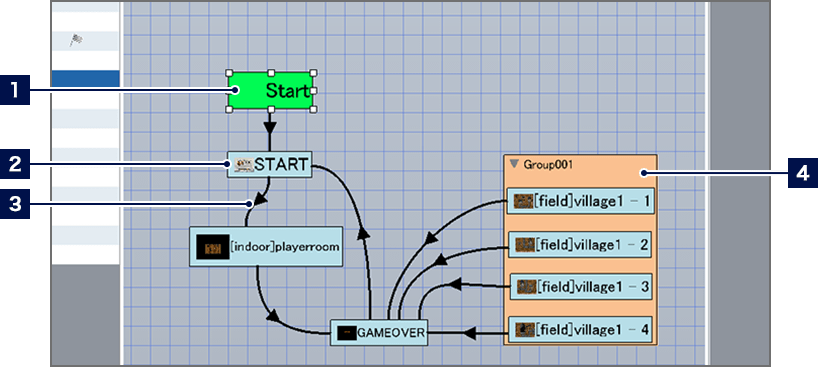
- 1Start
- You can link the first scene to be displayed in the game from "Start". Select a scene, right click and select "Set as Start Scene" from the context menu.
- * The Start Scene will be given a
 drag them to move them.
 - 2Scenes
- You can change the size of placed scenes, or drag them to move them.
- 3Links
- Click the arrows to select them. When selected, drag the edge to change the location. Links that haven't been configured in detail are indicated by a dotted line.
- 4Group
- It is possible to combine and manage multiple scenes in "Groups". Select Group and right click, and upon selecting "Add to this Group" from the context menu, clicking a scene will add it to that group.
Menu Button Functions
The menu button at the bottom of the flow chart area allows you to perform the following operations.
 Snap to Grid Snap to Grid |
A function that allows you to arrange scenes following the grid (a lattice of measurement lines). |
|---|---|
 Display/Hide Grid Display/Hide Grid |
Switches between displaying and hiding the grid. |
 Display Toggle Display Toggle |
Switches between displaying and hiding the flow component list. |
 Add Group Add Group |
Adds a group to the flow chart. |
 Delete Item Delete Item |
Deletes the selected item. |
Detailed Link Settings
Select by clicking a Link arow and the detailed settings for the link will be displayed on the right of the screen.
Changeover Conditions
In the "Changeover Conditions" tab, you can set up the condition for a Link's scene transition to occur, and the initial value after the changeover. By configuring the "Detection Priority", the larger number will be prioritized in cases where there are multiple route transitions occurring under the same conditions.
Sequence Before Changeover
If you wish to add a screen or voice sequence before the scene transition occurs, you will make those configurations here.
Sequence After Changeover
If you wish to add a screen or voice sequence before the scene transition occurs, you will make those configurations here. If you wish to add a screen or voice sequence after the scene transition occurs, you will make those configurations here. Additionally, if there are changes to Switches or Variables after the transition, or if you would like to give an object a specific behavior after transition, you will make those configurations here.