ObjectsOther Settings
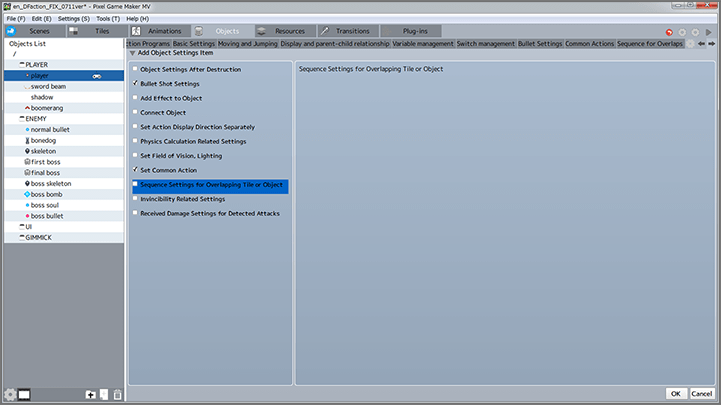
You can add other setting tabs by clicking the ![]() on the far right of the tabs menu. Check the item you want to add, and select "OK".
on the far right of the tabs menu. Check the item you want to add, and select "OK".
* When items are unchecked, their settings will be reset.

Object Settings After Destruction
When you add the "After Destruction" tab, you can set other objects to lose HP when an object is destroyed.
You can also set various actions to execute when an object is destroyed, by clicking "+" under "Other After Destruction Settings" and displaying the registration window.
Bullets Fired Settings
When you add the "Bullets Fired Settings" tab, you can adjust the behavior of bullets fired by objects (such as player characters and enemies) that attack by shooting bullets.
When you click "+" in the "Bullets List", a bullet will be added to the list. You can adjust the following settings for each bullet.
| Basic Settings | Set the objects to be used as bullets, number of bullets fired, etc. |
|---|---|
| Bullet Path (Default Motion) | Selects between "Don't Set Direction" or "Shoot in Specified Direction" to set the firing direction of bullets at the moment of firing, as well as other more detailed settings. |
| Bullet Path (Changes) | Adjusts settings for when fired bullets track a specific object, describe a boomerang trajectory, etc. |
| Bullet Options | Adjusts settings for gravity effects and bullet speed. |
Add Effect to Object
When you add the "Effect" tab, you can set up various effects animations and particle animations for objects in sequences.
When you click "+" in the "Effects List", an effect will be added to the list. You can adjust the following settings for each effect.
| Basic Settings | Specifies effects and particles to be displayed from the registered objects. You can also set them to toggle between being shown or hidden with a particular switch, by using "Set Show/Hide Switch". |
|---|---|
| Display Settings | Sets display position, duration until disappearance, etc. |
Connecting Objects
Making an object appear attached to another object is called an "Object Connection". When you add the "Object Connections" tab, you can manage connected objects.
When you click "+" in the "Object Connections List", an entry will be added to the list. You can adjust the following settings for each entry.
| Basic Settings | Specifies a connected object. You can also set the connection to toggle between being enabled or disabled with a particular switch, by using "Set Enable/Disable Switch". |
|---|---|
| Display Settings | Sets the display position for connected objects. When "Use Connection Point" is selected, the connection point set in the "Animation" tool will be used as the display position. |
| Options | Sets relationships between objects, such as parent-child relationships and priorities. |
Setting Action Display Direction Separately
When you add the "Display Direction" tab, you can set up different control buttons (keys) from the standard settings to control movement in four directions (up/down/left/right) for a particular action box.
Physics Calculation Related Settings
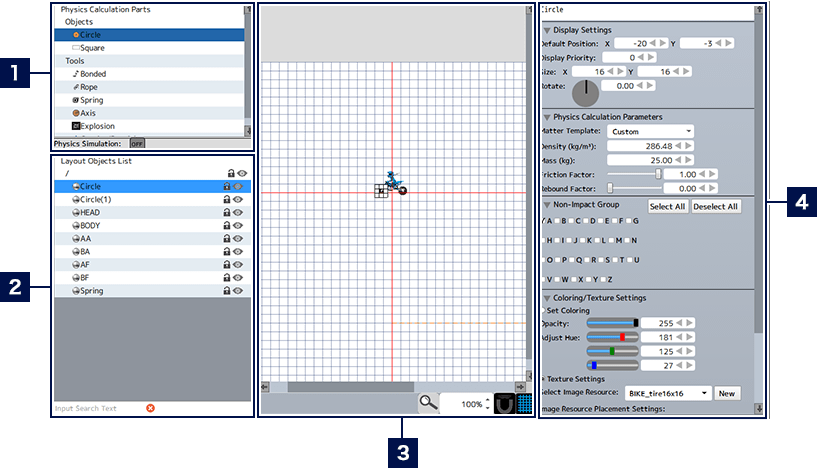
When you add the "Physics Calculation" tab, you can add Physics Calculation Parts to objects, and adjust the settings for physics calculations. Switch between "Physics Calculation Basic Settings" and "Add Physics Calculation Parts" using the tabs at the top of the area.
Physics Calculation Basic Settings
Sets the degree to which these objects will affect other physics calculation objects, and be affected by them. You can also fine-tune the parameters for physics calculations, and set up "Non-Impact Groups" (objects in a group with this checked will not impact each other).
Add Physics Calculation Parts
Adds physics calculation parts to objects.

- 1Placeable Physics Calculation Parts List
- For the functions of each part and details about the placement process for each, see here. Also, when "Physics Simulation" is set to ON at the bottom of the list, you can check the behavior of placed physics calculation parts.
- 2Placed Parts List
- When a part is clicked, the corresponding part in the editing area will be selected, and can be moved or configured in detail. Also, by clicking on the icons to the right of the list, you can lock parts (to prevent editing), or hide them in the editing area.
- * Even when parts are hidden in the editing area, they will still be displayed in-game.
- 3Editing Area
-
 Snap to Grid
A function that allows you to arrange parts following the grid (a lattice of measurement lines).  Display/Hide Grid
Switches between displaying and hiding the grid. - 4Detailed Settings for Selected Part
- When a placed part is selected, information about it will be displayed, and its various settings can be changed.
For more information about settings, see here.
Setting Field of Vision, Lighting
When you add the "Field of Vision, Lighting" tab, you can set the "Field of Vision" for objects such as enemies, and set the "Lighting" that illuminates a certain range around an object.
When you click "+" in the "Field of Vision/Lighting List", an entry will be added to the list. You can adjust the following settings for each entry.
| Basic Settings | Selects whether to set up a field of vision or lighting. You can also set the field of vision or lighting to toggle between being enabled or disabled with a particular switch, by using "Set Enable/Disable Switch". |
|---|---|
| Field of Vision/Lighting Shape | Sets the size, angle, direction and so on for a field of vision or lighting. You can set the hue and transparency of lighting by selecting "Apply Selected Color". |
| Field of Vision/Lighting Connection | Sets a location as the point of origin for a field of vision or lighting. |
Using Fields of Vision
Fields of vision are primarily set up for objects such as enemies. Visual fields are not displayed on the screen in-game, but by combining them with linked condition settings such as "Discovered Other Objects", you should be able to trigger behavioral changes when these objects spot something.
Setting Common Actions
Common actions are actions that always execute when particular conditions are met, regardless of the state of the object. When you add the "Common Actions" tab, you can set the conditions for switching to a common action, as well as the action to be executed.

- 1Common Switch List
- When you click "+", an entry will be added to the list.
Select the arrow to the left of the action name to set the conditions for switching to this action.
Select the arrow to the right to set the conditions for switching back to the previous action.
Select the action name to set the action to be executed. - 2Detailed Settings for Actions and Links (→ See here for more information)
Sequence Settings for Overlapping Tiles or Objects
When you add the "Overlapping Sequence" tab, you can add sequence effects such as solid color fills or transparencies when this object overlaps with a tile or another object.
Invincibility Related Settings
When you add the "Invincibility Related" tab, you can set objects to become temporarily invincible. Objects in an invincible state will not receive damage from sources such as attacks. When you click "+" in the "Invincibility List", an entry will be added to the list. You can adjust the following settings for each entry.
| Basic Settings | Sets the duration of invincibility. |
|---|---|
| Invincibility Display | Sets sequences such as filter effects or blinking. |
| Other Settings | Adjusts other settings. You can also set the invincibility to toggle between being enabled or disabled with a particular switch, by using "Set Enable/Disable Switch". |
Received Damage Settings when Attack is Detected
When you add the "Received Damage" tab, you can adjust the damage incurred by an object to be higher or lower when specific conditions are met, or in response to attacks with a certain attributes. When you click "+" in the "Received Damage List", an entry will be added to the list. You can adjust the following settings for each entry.
| Basic Settings | Sets damage increase/decrease, changes critical rate, etc . |
|---|---|
| Specify Target Attack's Attribute Settings | Sets the received damage to change only when attacked using a specific attribute, by selecting "Preset Attributes" or "Set by Attribute Value". |
| Received Damage Display Settings | Sets sequences such as filter effects or blinking. |
| Other Settings | Adjusts other settings. You can also set the received damage changes to toggle between being enabled or disabled with a particular switch, by using "Set Enable/Disable Switch for Received Damage Settings". |