AnimationsMotion: Setup Process
Setting the Origin of a Resource
The "origin" places an object in a scene, and serves as the basis for any connections with other objects. An origin needs to be set for each resource that you use. When a motion animation is selected in the animation list, you can set the origin of each resource in the detailed settings area. Select an entry to set from the list of "Registered Resources", and specify an origin.
Origins and Centers
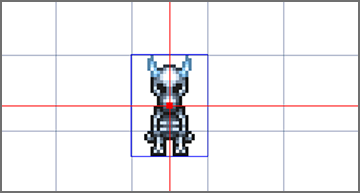
When displayed in the preview area, the point where the red vertical axis crosses the horizontal axis is the origin. The point marked with a red square is the "center", and becomes the reference position when resizing or rotating the image. The blue line around the resource indicates its edges.

Adding Motions
You can add a new entry by clicking the "+" in the upper right of the various fields in the Animation Management Area. You can also delete a selected entry by clicking the "-". When adding a new motion, after adding display directions as necessary, be sure to set the corresponding frames for each.

Basic Motion Settings
When a "Motion" entry is selected, you can adjust the general settings for the motion in the detailed settings area.
| Basic Animation Data | When a "Displayed Frame Count" is set, the default frame count will be set to that value when adding new frames. You can also adjust the loop settings. |
|---|---|
| Registered Resources | Shows the registered resources. |
Direction Settings
When a "Display Direction" entry is selected, you can adjust the "Direction Settings" in the detailed settings area. Also, when setting up frames included in the currently selected display direction, you can set the image to be used as the original resource.
* Only one image can be set in any one display direction.
Basic Frame Settings
When adding an entry to "Frames", please adjust the following settings in the detailed settings area.
* The numbers displayed for each frame are the second the frame begins (s) and the number of the frame (f).
| Basic Settings | Sets the length for which the frame is displayed (number of frames). You can also set any SFX or voice clips to play while the frame is displayed. Also, when "Interpolation" is set, if there are any differences from the previous and/or following frames in image, detection positions, or size, they will be automatically compensated for. |
|---|---|
| Display Related | Sets the offset (image position) and center, scale (adjusted image size), and so on. Also flips and rotates the image, adjusts the hue, and so on. * In "Offset", you can adjust the position while preserving the relative position of the image and its various detections. |
| Select Image for Frame | Displays a preview of the selected image. The section selected by the red border will be used as the image for the frame. * The size of the red border will be whatever is set under Image Partitions. |
Setting Keyframes
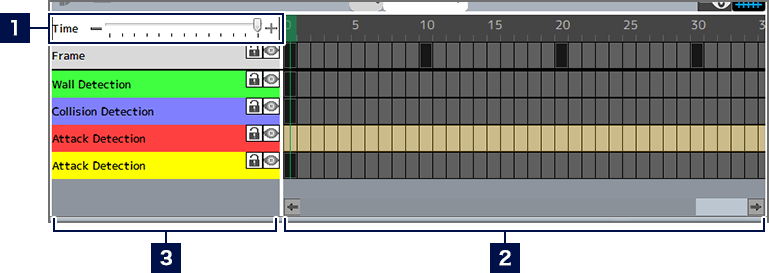
When a frame is selected in the Animation Management Area, its content is displayed in detail in the timeline area. In the timeline, you can select frames one by one, and add "Keyframes" with various detections.
Timeline Area View

Placed keyframes can be dragged and moved within the same entry.
| Frame | Displays the switched positions of frames placed in the frame timeline as keyframes. |
|---|---|
| Wall Detection | Uses a mutual range of wall detection to determine whether an object should pass through or collide with tiles and so on when they make contact. You can check whether wall detection has been set for each frame in the Wall Detection Timeline. |
| Collision Detection | Collision detection indicates the range within which an enemy's attack will hit. You can check whether collision detection has been set for each frame in the Collision Detection Timeline. |
| Attack Detection | Attack detection indicates the range within which damage is done by making contact with an enemy. You can check whether attack detection has been set for each frame in the Attack Detection Timeline. |
| Connection Point | When a given object is displayed as attached to another object, the position that connects the two objects is a connection point. You can check whether a connection point has been set for each frame in the Connection Point Timeline. |
Adding Keyframes
You can add a keyframe by selecting a frame in the timeline, right-clicking, and selecting "Add Keyframe". You can also select a frame and set a keyframe from "Basic Settings" in the detailed settings area. When keyframes are added with various detections or connection points, all subsequent frames will be set to have those detections (the shape of the detections/connection points will conform to the settings for the keyframe, and when a new keyframe is added midway, their shape can be changed). Also, when "Add Blank Keyframe" is selected for a frame with detections, all subsequent frames will be set to have no detections.
Setting the Shape of Detections and Connection Points
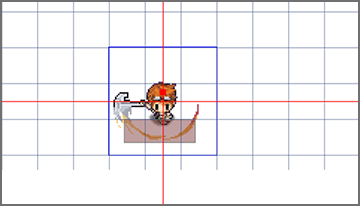
The range of each detection can be set in a quadrangular shape. This can be set in the detailed settings area under "Specify Size and Position". You can also move and change its size by dragging after selecting the detection in the preview area.
Connection points work in the same way, but only their position can be changed.
