AnimationsParticle Animations
Editing Area Configuration
When a particle animation is selected from the animation list, the editing area will switch to the configuration below.
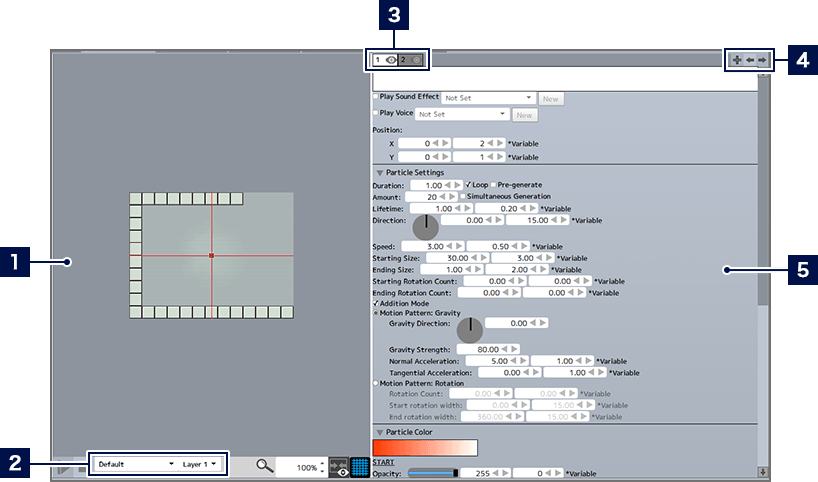
- 1Preview Area
- The position and generation range for a selected particle is displayed as a red quadrangle. The functions of the menu buttons and so on at the bottom of the area are basically the same as when creating a motion animation.
- 2Scene Change Menu
- When the particle simulation window is displayed, you can select the scene and/or layers to be displayed behind it from the pull-down menu.
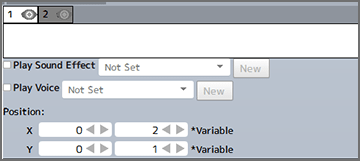
- 3Layer Tabs
- Multiple particles can be placed in one particle animation. One particle can be set for each layer. Also, the further left a layer is listed, the higher it is in the layer stack. Click the tabs to switch the selected layer.
You can also switch between showing and hiding layers by clicking .
. - * Layers that are hidden will be hidden in the simulation window, but will still be displayed in-game.
- 4 Layer Editing Buttons
-
 New Layer
Adds a new layer (which will appear at the bottom of the stack).  Toggle Left
Selects the tab to the left of the currently selected layer.  Toggle Right
Selects the tab to the right of the currently selected layer. - 5Detailed Settings Area
- Adjusts various settings for the particle(s) in the selected layer.
Changing Settings
Particle settings can primarily be adjusted in the detailed settings area.
Basic Settings
You can set the position and generation range for a particle under "Position" in the detailed settings area. Set the position (left-hand number) and range (right-hand number) based on the origin for both the X axis and Y axis. You can also set it up the same way by selecting the particle in the preview area and dragging. You can also set any SFX or voice clips to play while the particle is displayed.
Particle Settings
The input field to the right of each entry indicates "Fluctuation". When the fluctuation is set, the content of the entry will disperse to the intended extent of the value.
| Duration | Sets the period of time for which the particle will be generated. It can also be set to loop, or to be generated before the animation starts. |
|---|---|
| Amount | Sets the maximum amount of particles displayed in the screen. Also, particles are generated at the interval of the "Amount/Lifetime". When "Simultaneous Generation" is checked, the specified particles will be generated all at once. |
| Lifetime | The time until the generated particle vanishes. |
| Direction | The direction in which the particle is generated. |
| Speed | The speed at which the generated particle moves. |
| Starting/Ending Size | The size of the particle when generated and when destroyed. |
| Starting/Ending Rotation Count | Sets the rotation count of the particle when generated and when destroyed. Rotates to the right when the numerical value is set as positive, and to the left when set as negative. |
| Addition Mode | When checked, the particle will be displayed in addition to whatever else is behind it. |
| Motion Pattern | Sets the pattern of motion for the generated particle, to either "Gravity" or "Rotate". When set to "Gravity", the particle will be affected by gravity and fall accordingly. You can set the direction, strength, normal acceleration, and tangential acceleration of gravity. When set to "Rotate", the particle will disperse in all four directions while rotating. You can set the rotation count (speed of rotation), and rotation width (displayed width within which the particle Is generated and destroyed). |
Particle Colors
You can set the hue and degree of transparency of the particle when it is generated and when it is destroyed.
The particle will be generated in the hue set under "START", and gradually get closer to the color set under "END" until it is finally destroyed.
Particle Templates
Each particle shape can be selected from the template displayed in the preview.
You can import image files (in png, jpg, webp, or tga format) and add them to the templates by clicking the "+" button. You can delete any added templates with the "-" button.
* The default templates cannot be deleted.
Other
You can add detections to generated particles. When detections are added, you can set particles to vanish or bounce off when they encounter the wall detection of objects.
* The format of detections with generated particles will be the same as the format of the particles themselves, as selected from the templates.
Checking with the Simulation Window
When the animation is played back with  , the simulation window will open separately. You can view the actual behavior of the added particles in this window. You can also set background scenes and layers in the scene change menu, and check the movement of particles in those scenes.