RPG MAKER MZ HELP
Database

Tileset Settings
This Data's Role
Tilesets are data consisting of "Tiles" used to design a single map. They're created by assigning images to be used as tiles and their in-game behaviors, such as whether characters can pass through them or not.
Original images created for the map can be used as well by creating tilesets which use those images, and assigning them to the map data.
Additionally, whether or not vehicles (boats/large ships) can pass through tiles is determined by their position within the tileset. Please see [Asset Standards] for more information.
Planes are able to travel over all tiles. However, they are only able to land on tiles which can be walked on.
*Planes cannot land on the locations subject to the following conditions even if the tiles can be walked on.
- Bush Elements
- Tileset A1
Parameter Details

Basic Settings
-
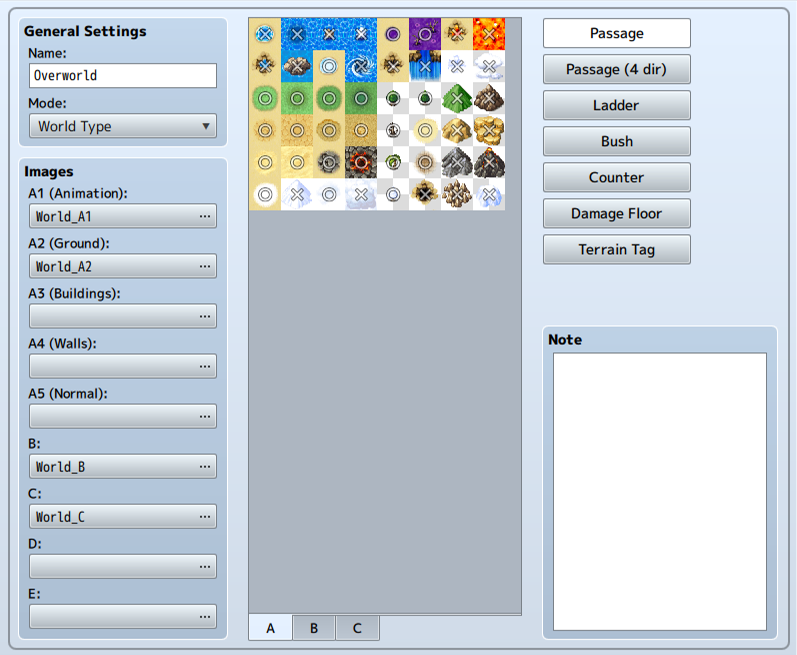
Name
The name of the tileset. This property is only used in the editor and does not affect the game.
-
Mode
The purpose of the tileset. This primarily influences Lower Layer Tile Special Specifications and Handling Battle Backgrounds.
In general, please choose [Field Type] for tiles which represent the overworld (such as ocean and land), and [Area Type] for all other situations.
Images
Settings for the image files used in tiles. Specify the file you want to use for each type (Sets A through E) in the [Select an Image] window that appears when you press the button for each. The image's contents will be displayed in the [Tile List] on the right.
Tile List
The tile images set in [Image] will be displayed here. By clicking tabs [A] through [E] below, you can switch the images displayed. The tiles for the images specified in [A1] through [A5] in the [Image] section on the [A] tab will be displayed in order.
Marks representing the current parameter values in the settings editing mode will be displayed on top of each tile. You can change these parameter values by clicking them.
Additionally, for items with 3 or more types of setting values (passage, terrain tags), pressing the right button will reverse the direction from that of the left button.
By moving your cursor with the button held, you can change the settings for the tiles that your cursor moves through.
-
Passage
Switch to the editing mode where you can set whether a tile can be entered or not. Tiles marked with a [○] can be entered, while ones marked with an [×] cannot. Those which have a [☆] can also be entered, however this is used for hiding characters behind buildings (only possible in tabs other than [A]).
-
Passage (4 Dir)
Switch to the editing mode where you can set the direction(s) from which a tile can be entered. Use [Passage: Block] to create tiles that can be passed through only from a specific direction. For example, when you set the edge of a tile that represents a cliff as impassable, characters will be unable to move between that tile and the next tile, creating a sense of height.
Directional marks shown in the tile list indicate that it is possible to move from that direction, while no mark means the tile is impassable from that direction. Moreover, by changing the parameters of the [Passage] setting, these settings will change automatically. -
Ladder
Switch to the editing mode for ladder settings. When you add this setting, the direction a character using this tile faces will be locked to up, giving the appearance of going up and down things like ladders and ropes.
Click the marks in the Tile List to change tiles to enable/disable this setting. A mark (ladder) will be displayed on tiles which have this setting. -
Damage Floor
Switch to the editing mode for Damage Floors. When a tile is given this setting, characters will receive damage when crossing this tile. This can be used for representing dangerous terrain like poisonous swamps or trees with thorns.
Click the marks in the Tile List to change tiles to enable/disable this setting. A mark (two triangles) will be displayed on tiles which have this setting. -
Bush
Switch to the editing mode for bush settings. When a tile has this setting, the bottom 12 pixels of characters crossing this tile will appear half transparent, as if their feet are being hidden by dense grass.
However, some tiles will not become half transparent depending on the image when giving this setting to tiles in [A1] through [A4].
Click the marks in the Tile List to change tiles to enable/disable this setting. A mark (two wavy lines) will be displayed on tiles which have this setting.
-
Counter
Switch to the editing mode for counter settings. When a tile is given this setting, it will start events even when a character and event are not immediately adjacent to one another, allowing you to create settings such as those where a character speaks to someone with a desk between them.
Also, when applying these settings to tiles in [A2], tiles having this element will be adjusted 12 pixels downward.
Click the marks in the Tile List to change tiles to enable/disable this setting. A mark (a diamond) will be displayed on tiles which have this setting.
-
Terrain Tag
You can assign values between 0 and 7 to each tile. No specific uses are defined. This value can be retrieved by using the [Get Location Info] event command. Retrieved terrain tags located in upper layers other than zero will be prioritized.
-
Notes
Used to make notes while making your game.
Right-click to show the menu and choose [Plugin Help...] to display the Plugin Help information.