RPG MAKER MZ HELP
Events

Map Event Settings
Common Settings and Event Page Controls

-
ID (Displayed in Title Bar)
The event's unique ID number. IDs will be automatically set for each map in the order that they are created. This ID is used for occasions such as specifying events using variables.
-
Name
The name of the map event. This field is only used in the editor and does not affect the game. A name that uses the ID will automatically be entered when an event is created. If necessary, change the name of the event to something more easily identifiable.
-
Memo
A text area where you can freely enter notes.
-
Event Page ID
The event page ID included in the event. By clicking a tab, you can switch to the event page that you wish to edit.
Event Page Control Buttons
The buttons located near the top of the window can be used to perform actions such as creating or deleting event pages. The functions of each button are as follows.
- New Event Page
- Creates a new consecutively numbered event page following the one that is currently being edited. Each additional new event page will have an ID that increases by 1 each time one is created.
- Copy Event Page
- Copies the contents of the event page currently being edited to the clipboard.
- Paste Event Page
- Adds (inserts) a new event page using the information in the clipboard. A new ID will be generated using the ID that follows the event page currently being edited. Each event page added will have an ID that increases by 1 each time it is created.
- Delete Event Page
- Deletes the event page that is currently being edited. The ID for each event page that follows the one that was deleted will have its ID decreased by 1.
- Clear Event Page
- Deletes the entire contents of the event page currently being edited (returns it to its initial state).
Event Page Settings

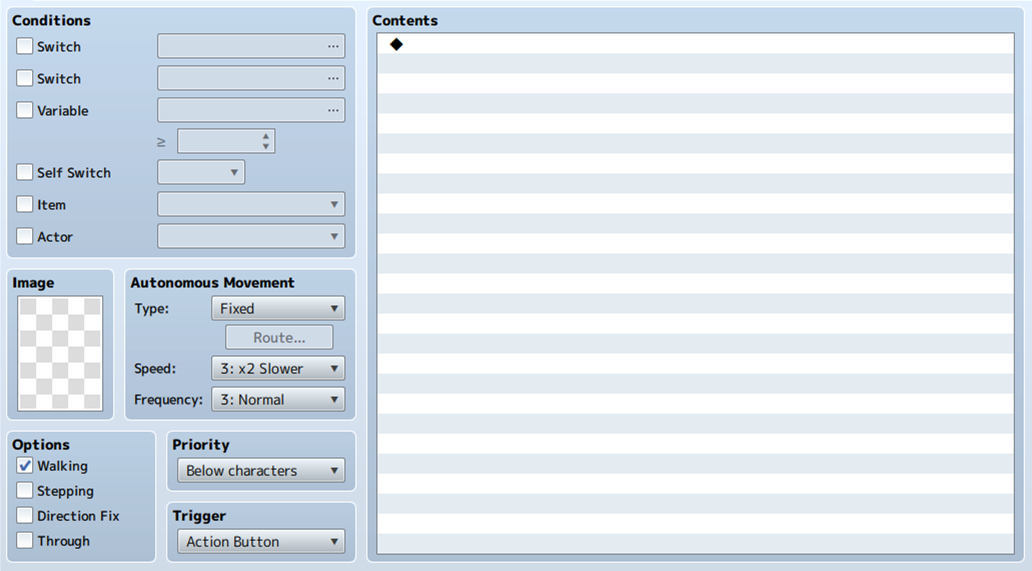
Appearance Conditions
Conditions for the Map Event to appear on the map based on the settings of this event page. Enable what will be used as the conditions within the [Switch], [Variable], [Self Switch], [Item], and [Actor] settings, and set the criteria to be evaluated.
Leave the condition settings disabled if you want to have an event occur regardless of the conditions. If multiple conditions are set, an event will only occur if all conditions are met. If the conditions of multiple event pages are met, the event with the highest ID value will be used. Conversely, an event will not occur if there are no pages which meet the conditions set.
-
Switch
The event will occur when the specified switch is set to ON.
-
Variable
The event will occur when the specified variable is greater than the fixed value.
-
Self Switch
The event will occur when the specified self switch is set to ON.
-
Item
The event will occur when a party possesses the specified item.
-
Actor
The event will occur when the specified actor is in the party.
Images
Images that are displayed when an event occurs on a map. To specify an image, click the file list (left) and image (right) in order in the [Select an Image] window that appears when you double-click inside the frame.
No image will be visible on the map if an image is not set. Select [(None)] located in the very top of the file list in the [Select an Image] window to delete the image you have set.
Autonomous Movement
Specifies how the Map Event will move based on the [Type], [Speed], and [Frequency] settings. [Speed] determines the speed at which a Map Event moves. The greater the number, the faster it will move. [Frequency] is the interval at which the map event moves. The greater the number, the shorter the movement interval will be. You can choose from the following 4 types of movements in [Type].
-
Fixed
The map event will not move.
-
Random
The map event will move around at random.
-
Approach
The map event moves towards the location of the player.
-
Custom
The map event follows a specified route. You can specify the route in the window that appears when you click [Set Movement Route]. For more information, please refer to [Set Movement Route].
Options
How the image will be displayed. Enable the items to apply as necessary.
-
Walking Animation
Displays animation when moving. Use when you want to display characters and animals as walking.
-
Stepping Animation
Displays the stepping animation while a character is stopped. Used for things such as displaying water surfaces or fire.
-
Direction Fix
Prevents the direction that the image is facing from changing while moving.
-
Through
Allows you to pass through terrain and events that cannot normally be passed through.
Priority
Choose from the options below in order to specify the priority of how players and other events are displayed when stacked on top of one another. The image that is on top will be prioritized and displayed when events and players can overlap.
-
Below characters
Players and so on will be able to move on top of this event. However, if a tile is selected in [Images], whether or not the player can move on top of that tile depends on the settings of the tile.
-
Same as characters
Will be at the same height as characters, and it will not be possible to go through this event.
-
Above characters
Players and so on will be able to move beneath this event.
Triggers
Choose the timing for when the [Contents] of an event that occurs on the map will be processed from the following options.
-
Action Button
When the player is adjacent to the event and presses the action button while facing in the direction of that event (or when overlapping an event where overlapping is possible).
-
Player Touch
When the player touches the event (or overlaps an event where overlapping is possible), or presses the action button while in that state.
-
Event Touch
When an event makes contact (or overlaps where overlapping is possible) with a player via the autonomous movement of the event, or when in the same state as in [Player Touch].
-
Autorun
When the event appears after meeting appearance conditions.
-
Parallel
When the event appears after meeting appearance conditions, contents of the event will be repeatedly processed.
Can be processed even when other events are being executed.
Contents
List of the processes that will be run when the [Trigger] is activated. For more information, please refer to the following [Editing Contents] section.
Editing Contents
Viewing the Contents of the List
Processes added to the game while playing are edited using commands called [Event Commands].
Event commands will be processed in order from the top item in the list and will be reflected in the game being played. Rows with a [◆] in the list indicate a registered event command. Rows with a [:] display the settings of event commands and indicate the position of where the flow of processes will be branched.
Additional Event Commands
Double-click the row with a [◆] to add an event command to the list. Select the event command to use in the window that appears, then define the details (excluding some parts) of the process. Double-clicking a row which already has an event command will insert a new event command in that position.
Context Menu Controls
Registered event commands will be displayed using a [◆]. Right-clicking this row will cause a menu to appear where you can perform actions such as copy and delete. The available action are as follows.
-
New
Insert a new event command at the selected position.
-
Edit
Re-edit the settings of the event command in the row that is selected.
-
Cut
Copies the contents of the selected row to the clipboard, then deletes it from the list.
-
Copy
Copies the contents of the selected row to the clipboard.
-
Paste
Inserts the contents of the clipboard to the row that is selected.
-
Delete
Deletes the event command in the row that is selected.
-
Select All
Selects everything in the list as items to be edited.
-
Copy as Text
Copies the selected lines of text to the clipboard.
-
Copy as HTML Tags
Copies the HTML of the selected lines of text to the clipboard.
-
Test
Tests the selected event in the game screen.
Selecting Multiple Items at Once
With one of the rows in the list selected, clicking another row while holding down the [Shift] key will select all the event commands (blocks that have a [◆]) within that range. Right-clicking those items selected (highlighted in blue) will allow you to perform actions to all the items at once via a context menu. However, you can only select the items which are in the same branch when including branch processes.